Configuring Bitbucket integration with a proxy server
Eyes/Bitbucket integration requires two ways communication between the Eyes server and the Bitbucket server.
Communication from the Eyes server to the Bitbucket server is needed during the setup phase, when you select repositories to integrate with; the Eyes server uses the Bitbucket API to create webhooks in the selected repositories, the webhooks send all the relevant Bitbucket events to Eyes. The Bitbucket API also is used to update the status when an Eyes batch is completed and the status needs to be updated on the Bitbucket commit or pull request.
Communication from the Bitbucket server to the Eyes server is needed when events are sent by the webhooks to the Eyes server
If your Bitbucket server is protected behind a firewall, and you cannot add a custom rule that exposes the relevant Bitbucket APIs so that Eyes can call them, you can use the Eyes-scm application to create webhooks on the relevant Bitbucket repositories. When using Eyes-scm, the Eyes server never calls the Bitbucket APIs directly, all calls are made through the application.
To use Eyes-scm, you need to set up integration and select the required repository in the Eyes-scm interface, not in the Eyes server admin dashboard.
Once integration is complete, the commit or pull request status update flow is also performed by Eyes-scm. The Eyes-scm application constantly polls the Eyes server for status update commands and updates the status when needed on the Bitbucket server.
Installation
Installation prerequisites
Before installing the proxy service, you must have:
-
Node.js installed (version 12 or later)
-
The URL of the Eyes server that you use to open the Test Manager
-
Your Eyes organization ID, available on the Admin/Account page in the ID field.
One-time setup
Set up the following environment variables so that they are available to the proxy service.
# set the Eyes server URL to your server
EYES_SERVER_URL=<https://myorganizationeyesapi.applitools.com>
#set the Eyes organization ID
EYES_ORG_ID=<org ID>
# set the HTTP port the proxy service should use (optional - default is 4000)
PORT=<1234>
To install the proxy server, run the following from any command shell:
npm i -g @applitools/eyes-scmRunning the proxy service
Configuration prerequisites
To set up Eyes-scm you need the following:
-
The API key of an Eyes user with team admin rights. See How to retrieve your API key.
-
The URL of the SCM server.
-
The Personal Access Token (PAT) that provides access to Bitbucket with read admin rights, available from Bitbucket.
-
The names of the repositories that you want to provide Eyes access to. You will select the required repositories from the list of available repositories displayed by the proxy service.
Running and configuring the server
Starting the proxy service
Use the following command to start the server:
eyes-scmConfiguring repositories and access credentials
The first time you run the server, you need to define the repositories you want Eyes to access, and provide the necessary Eyes and SCM credentials. You do this by starting the proxy service and the accessing it with a browser.
-
Make sure the proxy service is running, as described in Running and configuring the server.
Start a browser on the server where the proxy is running and navigate to the proxy service. The default URL is localhost:4000.
-
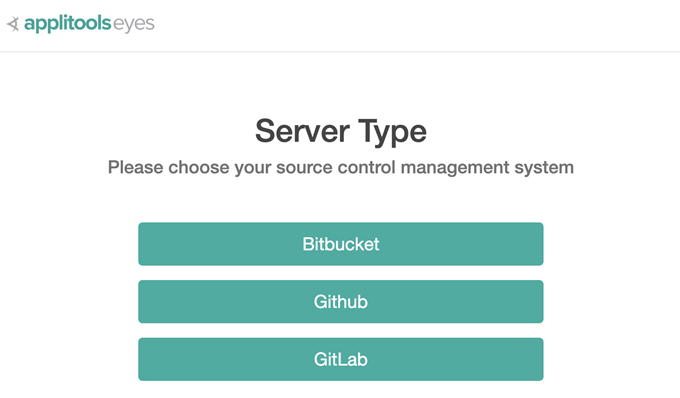
Select Bitbucket as the source control management system.
-
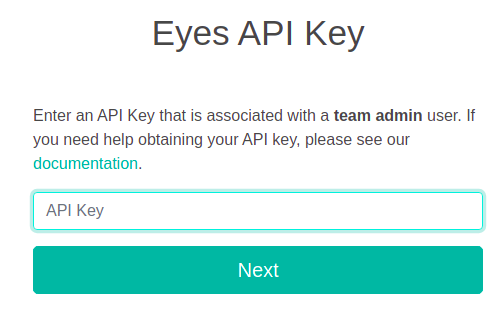
Enter an Eyes API key with Team Admin rights and full privileges. See How to retrieve your API key.
-
Click Next.
-
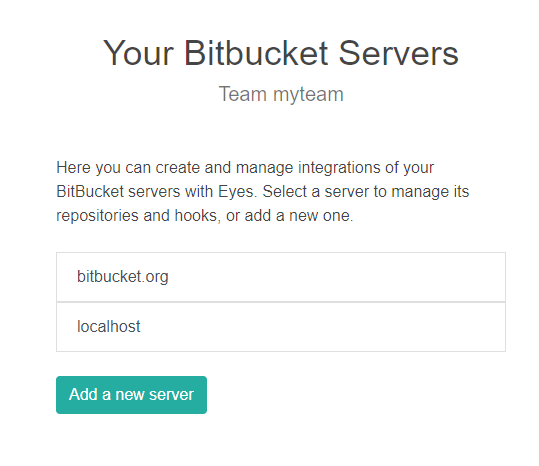
A list of any SCM servers that have already been configured is displayed. Select an existing server, or click Add a new server and enter the URL of the server.
-
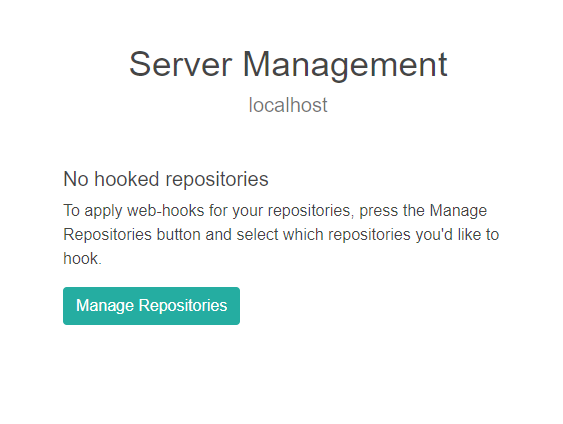
The first time you interact with the server, no repositories will have been enabled for Eyes access. Click Manage Repositories to select the repositories that you want to enable Eyes access to.
-
Click Next.
-
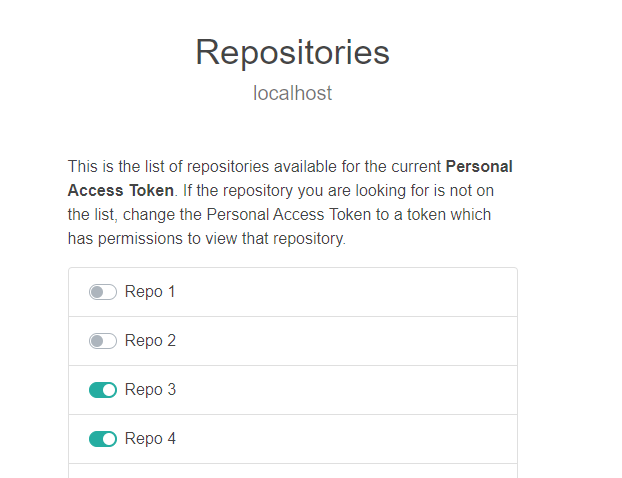
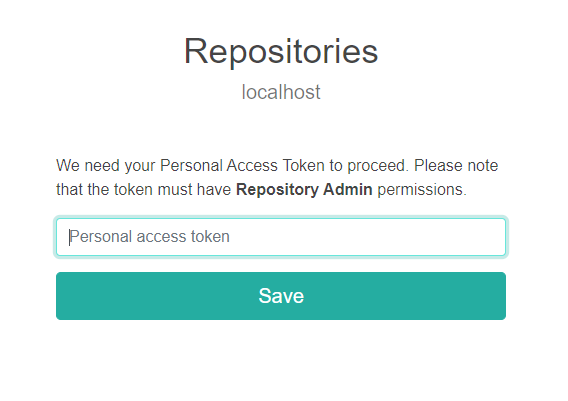
A list of repositories on the SCM server appears. The first time you configure the proxy service, all the repositories will be disabled. Click on the toggle next to the repository that you want Eyes to access, to provide a Personal access token (PAT) for repositories that are disabled, or to change the PAT for repositories that are already enabled.
-
Click Next. and enter the PAT for the repository. You can obtain the PAT value from Bitbucket.
-
Click Save.
If the PAT is valid, the repository you selected will be in the enabled state. You can now enable any other repositories that you want to allow Eyes to access, and then exit from the browser.